
This article provides step-by-step instructions that show you how to connect to your DIVAR Network or Hybrid remotely using your phone/tablet via the DIVAR Mobile Viewer app.
Step-by-step guide
![]() It is mandatory to connect the monitor & mouse & keyboard to your DIVAR.
It is mandatory to connect the monitor & mouse & keyboard to your DIVAR.
recommendation
When you add your DIVAR to the Remote Portal, please use a separate technician account to perform this action.
If you use an admin account to connect your DIVAR to it and you have forgotten the admin account password, you will need to re-enter the password locally, physically on your DIVAR after the reset.
Therefore, using a technician account that was added to an admin account after resetting the admin account password will not affect your DIVAR's password when added to the remote portal.
A) Set up DDNS & Remote Portal account
First, you'll need to create a Remote Portal account if you don't already have one.
If you already have an account, add it locally (not via the web interface) to your DIVAR by accessing Settings > Network > DDNS.
You can create the Remote Portal account in advance from any browser by accessing: https://remote.boschsecurity.com and clicking the Register button.
- See more details here: How do I create a company account in the Remote Portal?
Or you can create the Remote Portal account directly from your DIVAR hybrid/network if you have locally connected the monitor & mouse & keyboard to your DIVAR:
To get a new Remote Portal account from your DIVAR hybrid/network:
- Go to Settings > Network > DDNS > select “<strong data-id="48"Bosch Remote Portal” next to the DDNS type
important!
Make sure that the recorder is connected to the open Internet before you configure the DDNS service.
Open the image in full screen mode 
Open the image in full screen mode 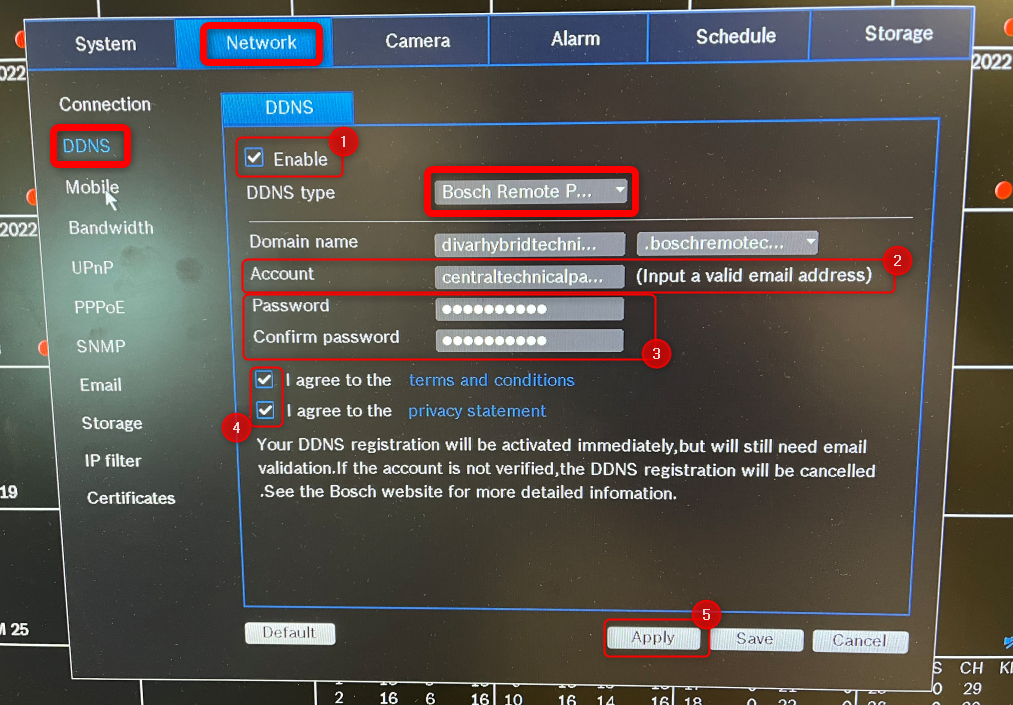
-
- Check the box next to “Activate.”
- Enter the email address that is used to log in to the remote portal
- Enter the technical password from the Remote Portal, which was generated as explained here: How do I create a technical password in the Remote Portal?
- Agree to the terms
- Click Accept → “Successfully registered” message will appear within a few seconds:
Open the image in full screen mode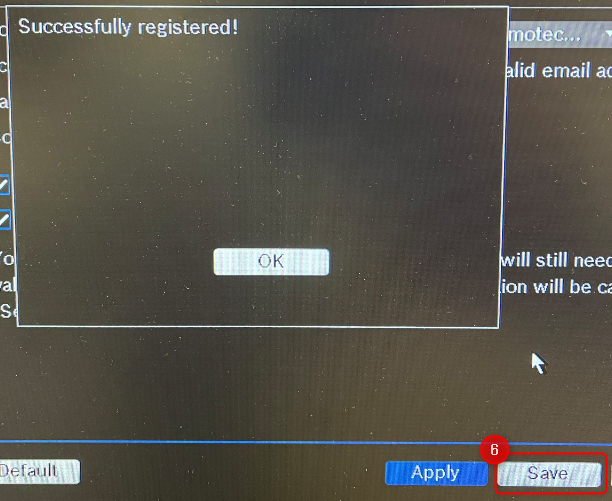
- Click Save
-
An email is sent to your specified email address with the activation link for the Remote Portal. Click on the link in the email. This will redirect you to the Remote Portal web page to sign in.
Open the image in full screen mode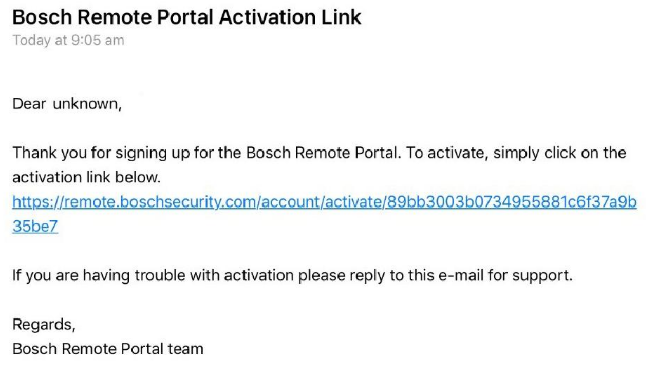
You should see this message:Open the image in full screen mode
After logging into your Remote Portal account, you should see the DIVAR as connected:Open the image in full screen mode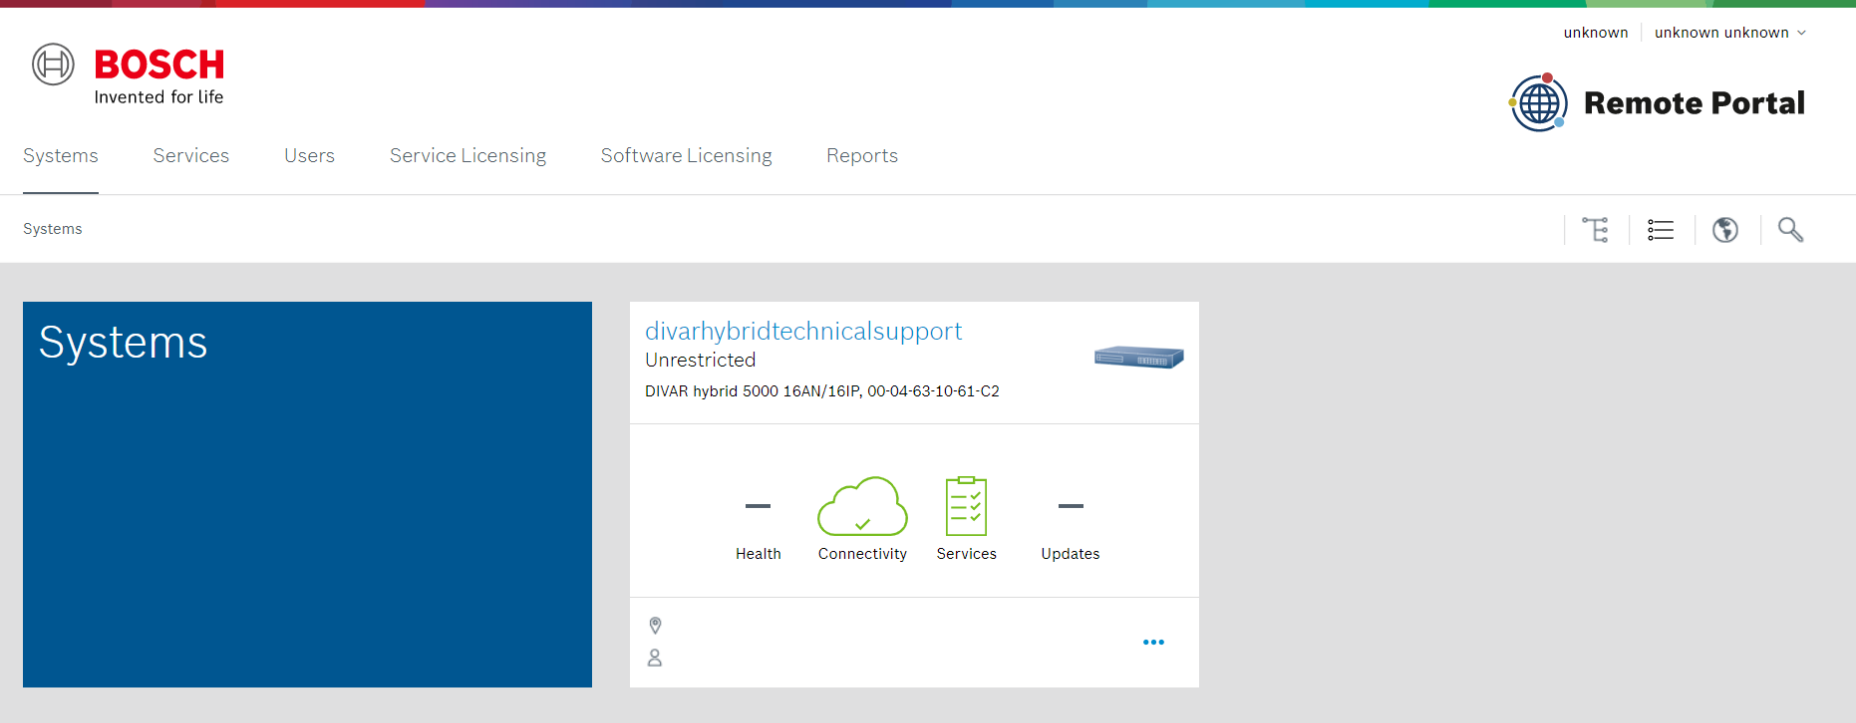
B) SET UP UPnP
Now you need to go to the UPnP menu and check the box next to Activate > and click Apply.
The status should show “Success” and the LAN IP and WAN IP fields are filled out. The table shows the port forwarding rules that are forwarded through your router when UPnP is enabled on the router.
tip
Please make sure that the public IP is set correctly.
If you don't know what your public IP is, type “What is my IP” into a search engine and you'll find it.
Open the image in full screen mode 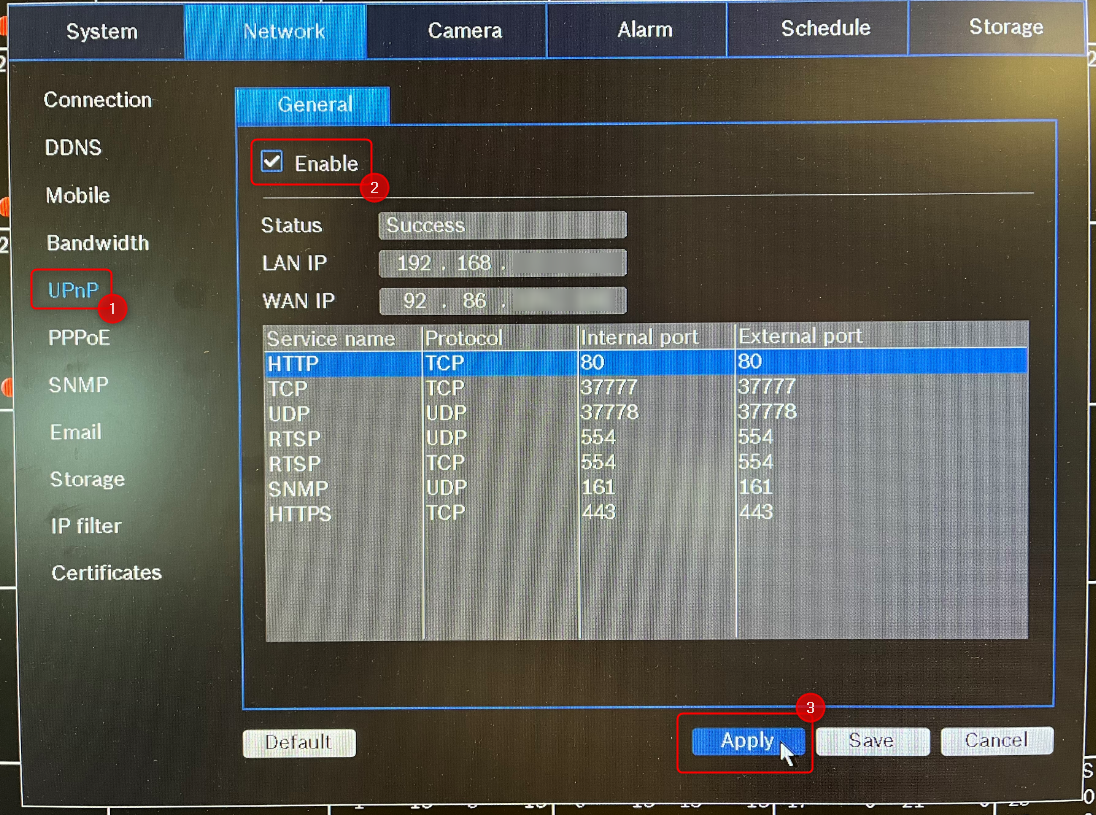
![]() Remotely accessing your Divar Network/Hybrid requires you to forward specific communication ports on your router, which connects you to the Internet.
Remotely accessing your Divar Network/Hybrid requires you to forward specific communication ports on your router, which connects you to the Internet.
Read your router's manual for instructions on how to port forward to a device, or you can point to this link, which provides basic port forwarding information.
The Divar Mobile Viewer app only requires TCP port 37777.
However, if you also plan to connect to the device remotely using a web browser, you must forward the HTTPS port and/or HTTP port. We recommend that you only use HTTPS connections for greater security.
See an overview of the default port values and how to use them below:
- TCP port: 37777 - used for video streaming, mandatory. This port is used by the Bosch DIVAR Mobile Viewer app to connect to the recorder. The web client also uses TCP port 37777.
- UDP port: 37778 - used for UDP data streaming
- HTTPS port: 443 - used for secure connections via the web browser
- HTTP port: 80 - used for connections via the web browser.
We strongly recommend that you only use HTTPS communication. However, when network bandwidth is limited, the system is under very heavy load, or the remote workstations are not powerful enough, the HTTP connection can be used to increase system performance and reduce network bandwidth usage.
- RTSP port: 554 - used to access the video via an RTSP stream
See also this article: Which ports are used by the DIVAR Mobile Viewer app?
C) Set up a mobile device | DIVAR Mobile Viewer app (phone/tablet)
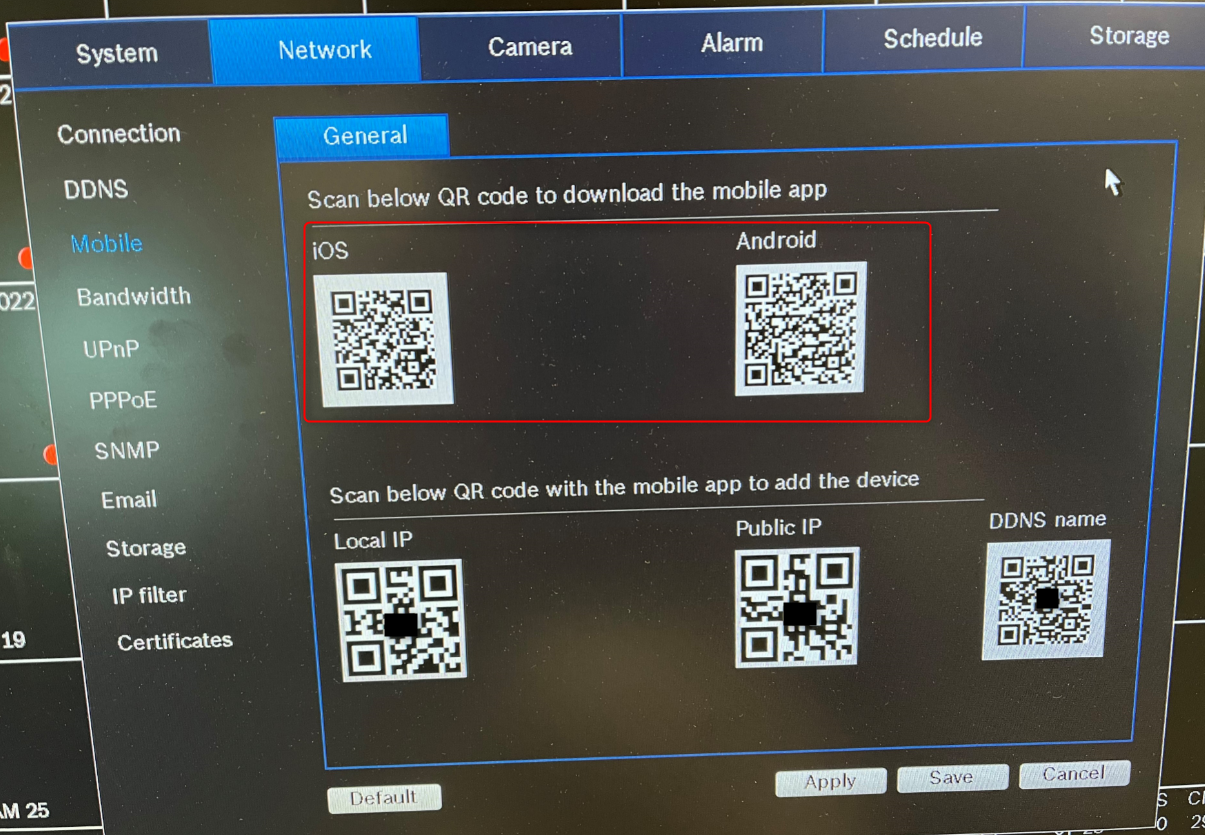
- Go to Network > Mobile > General and scan the QR code to download the Mobile Viewer app if you haven't already installed it on your phone/tablet
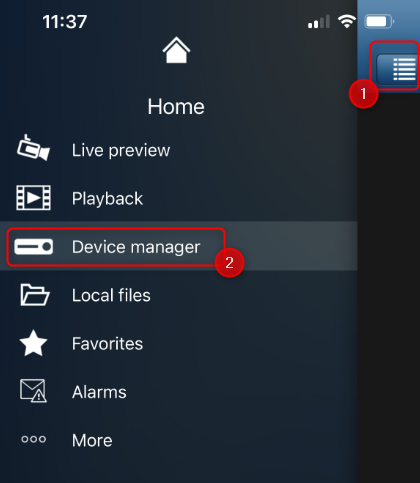
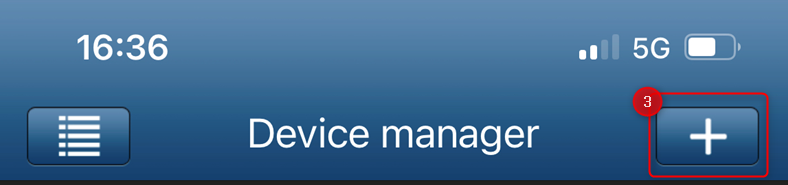
- Once the DIVAR Mobile Viewer app is installed on your mobile device, open the app > click on the menu on the left > select device management > then click + to add a new device
- Add the preferred name for your DIVAR
- Now you have 2 options to add your DIVAR in the app
-
Option 1: by scanning the QR code (next to the DDNS name) that appears on the DIVAR screen
Open the image in full screen mode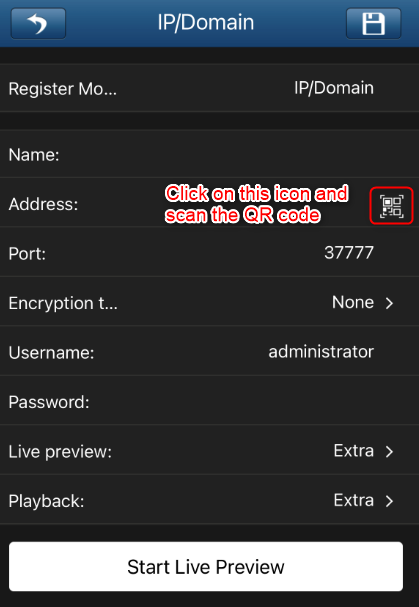 Open the image in full screen mode
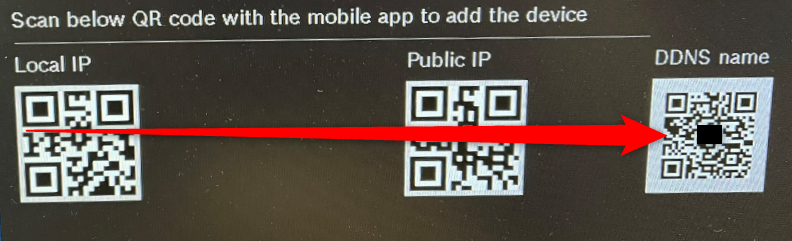
-
Option 2: by manually adding the details.
Note: If you add the details manually, you should enter the domain name from the DDNS menu on your DIVAR for the remote connection:
Open the image in full screen mode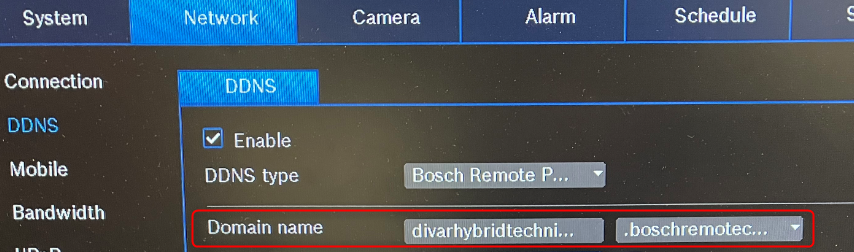
-
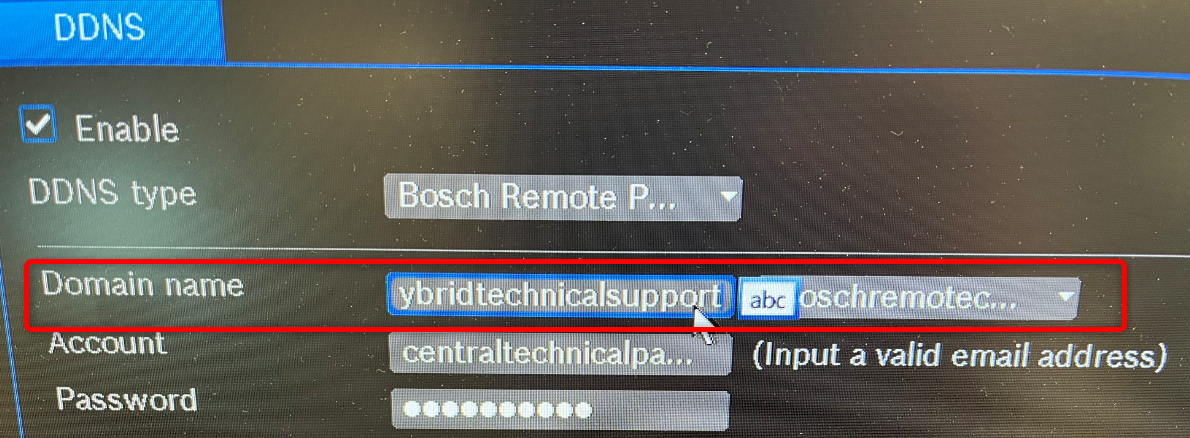
tip
The abc icon appears in the domain name when you hover over it. Move the mouse outside of it to make the abc symbol disappear.
![]() Behind the abc symbol is'. ' and not '@'
Behind the abc symbol is'. ' and not '@'
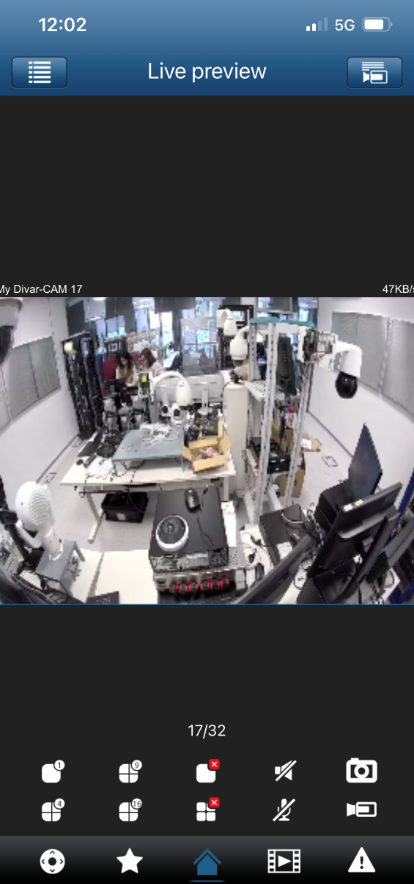
Whether you follow option 1 or option 2, you'll have the overview below in the DIVAR Mobile Viewer app:

- Enter the username and password and click Start Live Preview
important
The username and password are your DIVAR login details!
- Now you can remotely view the cameras connected to your DIVAR Network or Hybrid directly on your phone/tablet via the Mobile Viewer app!
Comments
0 comments
Please sign in to leave a comment.